Pimp my terminal

How we can improve our terminal with couple quick steps? I will show you the way.
Introduction
Inspired by the series of articles from Scott Hansellman and some personal experience of mine I will show how to change your terminal in some easy steps.

What to install
- Install Windows Terminal - you can use preview version because it is usually very stable
- Install most recent version of PowerShell
-
Install posh-git - with this extension you will get additional git status inside terminal
1
 Install-Module -Name posh-git
-
Install oh-my-posh - with this extension you add ability to customize how your shell will be rendered (more about this later)
1
 Install-Module -Name oh-my-posh
-
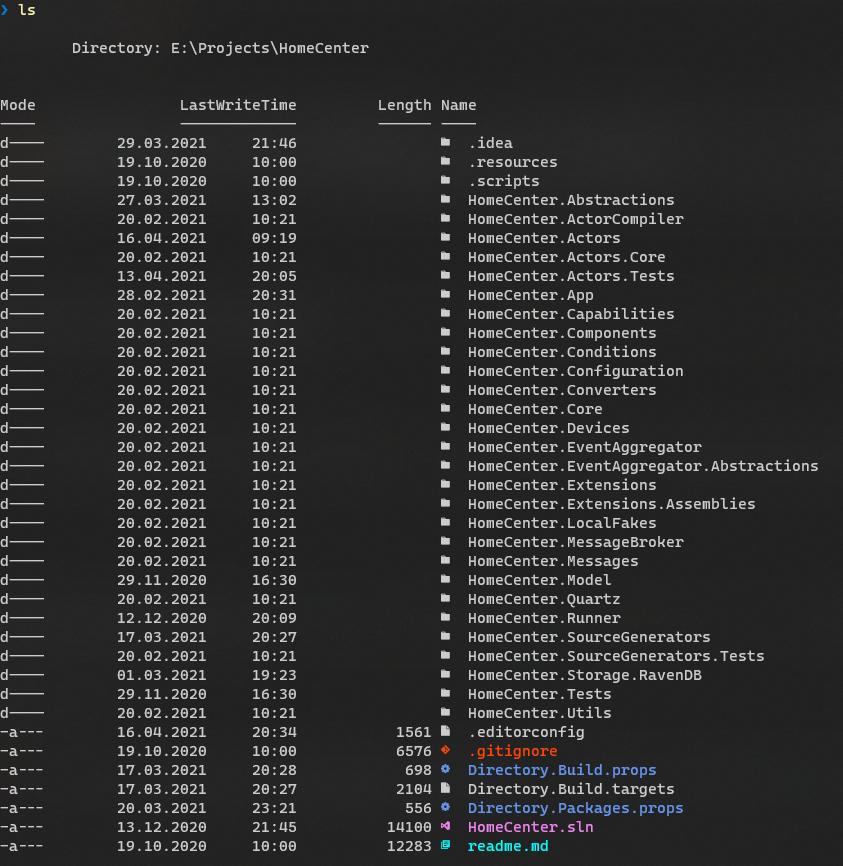
Install Terminal-Icons - to se icons of well known file types whe they are listed in terminal
1
 Install-Module -Name Terminal-Icons
-
Update PSReadLine to most recent version to have better editing experience
1
 Install-Module -Name PSReadLine -AllowPrerelease
- Install some nerd font Delugia Nerd Font - for proper display of all icons (of course you can have other that suits you)
Customize PowerShell profile
First of all set you Windows Terminal font (in settings file or new GUI)
1
"fontFace": "Delugia Nerd Font"
Next you should find your PowerShell profile and customize it a little bit. You can find your profiles here
1
$PROFILE | Format-List -Force
you can edit your profile by filling with commands below.
First we have to enable previously installed modules by using Import-Module command, next we set our theme for oh-my-posh (describe later in deep). We can also enable autocomplete for dotnet CLI when we are dotnet developers and finally define some shortcuts for command we are use on daily fashion (in example dotnet build and dotnet test - keep in mind that Ctrl+Shift+t is used by windows terminal defaults so you have to use unbound to disable default behavior)
1
2
3
4
5
6
7
8
9
10
11
12
13
14
15
16
17
18
19
20
21
22
23
24
25
26
27
28
29
30
31
32
33
34
# Import module
Import-Module posh-git
Import-Module oh-my-posh
Import-Module -Name Terminal-Icons

# Set oh-my-posh profile
Set-PoshPrompt -Theme  "E:\Projects\ps-profile.json"

# PowerShell parameter completion shim for the dotnet CLI
Register-ArgumentCompleter -Native -CommandName dotnet -ScriptBlock {
    param($commandName, $wordToComplete, $cursorPosition)
        dotnet complete --position $cursorPosition "$wordToComplete" | ForEach-Object {
           [System.Management.Automation.CompletionResult]::new($_, $_, 'ParameterValue', $_)
        }
}

# Shorcuts for our commands
Set-PSReadLineKeyHandler -Key Ctrl+Shift+b `
                         -BriefDescription BuildCurrentDirectory `
                         -LongDescription "dotnet Build the current directory" `
                         -ScriptBlock {
    [Microsoft.PowerShell.PSConsoleReadLine]::RevertLine()
    [Microsoft.PowerShell.PSConsoleReadLine]::Insert("dotnet build")
    [Microsoft.PowerShell.PSConsoleReadLine]::AcceptLine()
}

Set-PSReadLineKeyHandler -Key Ctrl+Shift+t `
                         -BriefDescription TestCurrentDirectory `
                         -LongDescription "dotnet Test the current directory" `
                         -ScriptBlock {
    [Microsoft.PowerShell.PSConsoleReadLine]::RevertLine()
    [Microsoft.PowerShell.PSConsoleReadLine]::Insert("dotnet test")
    [Microsoft.PowerShell.PSConsoleReadLine]::AcceptLine()
}
Custom oh-my-posh profile
In previous step we show path to our custom profile ps-profile.json that will give us result as below

we can achieve this with a custom profile thanks to version 3 of oh-my-posh. It has a modular structure and I will describe each element form left to right like on the picture (red numbers near each element). We can read more in documentation
- When we are running terminal as admin we will have special icon
- Next we can display current user and computer name
- Next we have current path
- Next is a sample of custom element not built in oh-my-posh but thanks to its extensible model we can define our own commands. In example I’m displaying current MsBuild version used in dotnet CLI
- Next to it we can see value of some environment variable - I have used ASPNETCORE_ENVIRONMENT
- Next we can see how long previous command was executed (if it last longer then configures)
- Next we display git status of current location
- On the right we can see start time of the command
- Last when some error occur we will se error icon
Script is also available here
1
2
3
4
5
6
7
8
9
10
11
12
13
14
15
16
17
18
19
20
21
22
23
24
25
26
27
28
29
30
31
32
33
34
35
36
37
38
39
40
41
42
43
44
45
46
47
48
49
50
51
52
53
54
55
56
57
58
59
60
61
62
63
64
65
66
67
68
69
70
71
72
73
74
75
76
77
78
79
80
81
82
83
84
85
86
87
88
89
90
91
92
93
94
95
96
97
98
99
100
101
102
103
104
105
106
107
108
109
110
111
112
113
114
115
116
117
118
119
120
121
122
123
124
125
126
127
128
129
130
{
"$schema": "https://raw.githubusercontent.com/JanDeDobbeleer/oh-my-posh/main/themes/schema.json",
"blocks": [
{
"alignment": "left",
"segments": [
{
"background": "#ffe9aa",
"foreground": "#100e23",
"powerline_symbol": "",
"style": "powerline",
"type": "root"
},
{
"background": "#ffffff",
"foreground": "#100e23",
"powerline_symbol": "",
"style": "powerline",
"type": "session"
},
{
"background": "#91ddff",
"foreground": "#100e23",
"powerline_symbol": "",
"properties": {
"style": "full"
},
"style": "powerline",
"type": "path"
},
{
"background": "#906cff",
"foreground": "#100e23",
"powerline_symbol": "",
"type": "command",
"style": "powerline",
"properties": {
"shell": "powershell",
"prefix": " ",
"command": "dotnet msbuild --version --nologo | ForEach-object { $_.Substring(0,$_.LastIndexOf('.')) } "
}
},
{
"type": "envvar",
"style": "powerline",
"powerline_symbol": "",
"foreground": "#ffffff",
"background": "#0077c2",
"properties": {
"var_name": "ASPNETCORE_ENVIRONMENT"
}
},
{
"type": "executiontime",
"style": "powerline",
"powerline_symbol": "\uE0B0",
"foreground": "#ffffff",
"background": "#8800dd",
"properties": {
"threshold": 500,
"style": "austin",
"prefix": " <#fefefe>\ufbab</> "
}
},
{
"background": "#95ffa4",
"foreground": "#193549",
"powerline_symbol": "",
"style": "powerline",
"type": "git"
},
{
"background": "#906cff",
"foreground": "#100e23",
"powerline_symbol": "",
"properties": {
"prefix": " "
},
"style": "powerline",
"type": "python"
},
{
"background": "#ff8080",
"foreground": "#ffffff",
"powerline_symbol": "",
"properties": {
"prefix": " "
},
"style": "powerline",
"type": "exit"
}
],
"type": "prompt"
},
{
"alignment": "right",
"segments": [
{
"foreground": "#ffffff",
"properties": {
"postfix": "]",
"prefix": "["
},
"style": "plain",
"type": "time"
}
],
"type": "prompt"
},
{
"type": "newline"
},
{
"alignment": "left",
"segments": [
{
"foreground": "#007ACC",
"properties": {
"prefix": "",
"text": "❯"
},
"style": "plain",
"type": "text"
}
],
"type": "prompt"
}
],
"final_space": false
}
We can also wee how icons are displayed

Additional notes
To keep you up to date with Windows Terminal on they blog and of course Scott Hansellman have many great blog posts on this topic.